Event Registration Form
To allow end users to register for an event held by your company, you can add an Event Registration Module to a page on your website. To add this module, Click on the Add item button. Use the Module dropdown, and select Event Registration Form.

A configuration box will open.
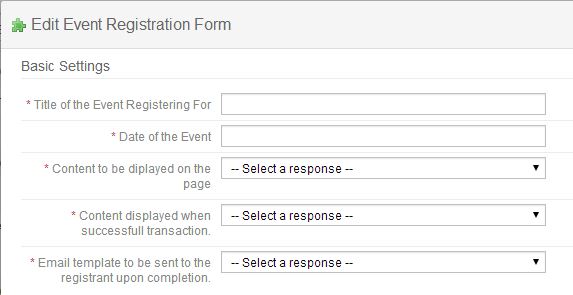
Fill out all information on the event.
- Title of the Event Registering For: Title of the specific event.
- Date of the Event: The date that the event will take place.
- Content to be displayed on the page: Use this dropdown to select the desired content area to display on the webpage for the event. Creating this content are is discussed in Content >> Website Content.
- Content displayed when successful transaction: Use this dropdown to select the desired content area for the user to see after they have completed their transaction. Creating this content are is discussed in Content >> Website Content.
- Email template to be sent to the registrant upon completion: Use this dropdown to select the desired email template to be sent to the user upon completing their transaction. Creating this templates are is discussed in Marketing >> Email templates.
Next, add all ticket options to the event.
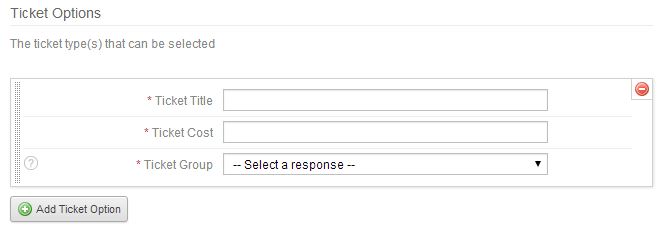
To add a new ticket option, click on the Add Ticket Option button.
- Ticket Title: The name of the specific type of ticket.
- Ticket Cost: The price of the specific type of ticket.
- Ticket Group: The static CRM group that each person who purchases this type of ticket will fall into. CRM groups are discussed in CRM.
When all setting are completed, click the OK button.
Articles in this section
- Add a Google Map to your Website
- Add an Image to Website Content
- Articles
- Event Registration Form
- File Browser
- Food & Services Menu
- Image Browser
- Instagram Feed to Website
- Menu Builder
- Sharing Files with Clients
- Using your Google Calendar
- Website Content
- Website Modules - Artwork Page
- Website Modules - Contact Us Form
- Website Modules - Photo Gallery
- Website Modules - Social Media Icon Module
- Website Modules - Staff
- Website Modules - Staff Table
- Website Pages
Have an additional question about any of the tools that you answered? Submit it here, and we will be in contact to help you!