Add an Image to a Deployment
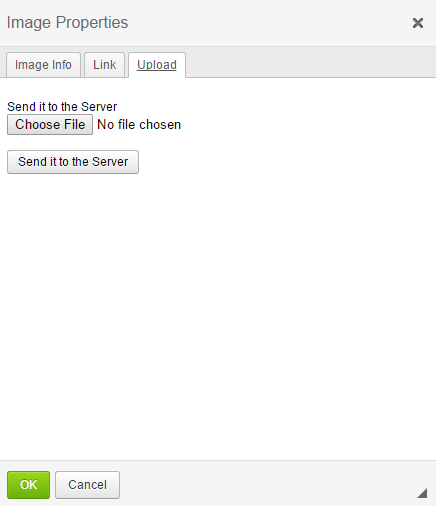
Images can be added to the HTML body of your deployment. To add an image to your deployment, start by clicking the  Image button in the CK Editor. This will open an Image Properties dialogue box.

Here is where you choose whether to take a photo from your image browser or computer. Either stay on the  tab, and click on
 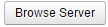 button to search your image browser, or click on the
  tab to browse your computer. This will switch the dialogue box to different options.
Click on  in order to search for the image you wish to upload. Once you have chosen the image, click on
 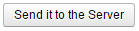 to upload the image to your deployment.(Note: this image will now be accessible through your image browser as well.)
**It is important when uploading new images from your computer, to use a naming convention that has NO SPACES. Instead, use hyphens or underscores if needed.
The dialogue box will move back to the image property tab.
- URL: This will be the direct path leading to the image, now in your image browser.
- Alternative Text: Content written in this field will be read by recipients in place of images, allowing the content and function of the image to be accessible to those with visual or certain cognitive disabilities. It is also displayed in place of the image in browsers if the image file is not loaded or when the user has chosen not to view images. This text will provide a semantic meaning and description to images which can be read by search engines or be used to later determine the content of the image from page context alone. This should be an accurate but simple description of your image. Apply this to EVERY image.
- Width: This is the width you wish the image to be. In most templates, there is guidelines for how large an image can be in order to fit in the spacing provided.
- Height: This is the height you wish the image to be. In most templates, there is guidelines for how large an image can be in order to fit in the spacing provided.
- NOTE: by using the lock icon located next to the width and height, you will fix the images proportions, this will avoid any stretching or squishing of the image. This is always recommended.
- Border: By increasing the number in this field, you will increase the thickness of the image border. Leaving this box blank will result in no border surrounding the image.
- HSpace: By increasing the number in this field, you will increase the thickness of the horizontal space surrounding the image. Leaving this box blank will result in no horizontal space between the image and the content around it.
- VSpace: By increasing the number in this field, you will increase the thickness of the vertical space surrounding the image. Leaving this box blank will result in no vertical space between the image and the content around it.
- Alignment: This is how you would like the image to align with surrounding text. This is only needed when an image in places in line with text of your email.
When you are satisfied with the options, click OK and the image will fall into the deployment. In order to come back and make any changes, just double-click the image at any time.
Have an additional question about any of the tools that you answered? Submit it here, and we will be in contact to help you!